

Shoulder pain is more than just a localized discomfort. It can disrupt the simplest daily activities, from getting dressed and combing your hair to reaching for an item on a high shelf. This joint, which has the most amazing range of motion in the human body, is a masterpiece of biomechanical engineering. But this very complexity and high mobility make it extremely vulnerable to injury.
This article is not merely a list of exercises. It is a comprehensive, evidence-based guide to help you not only manage your shoulder pain but also understand its root cause. We see this path to recovery as a collaborative journey. This guide provides you with the knowledge to understand your body and the tools to play an active role in your healing process. The main goal is to empower you to regain control of your shoulder health by providing a step-by-step, safe, and effective program. All recommendations are designed based on established principles of physiotherapy with an emphasis on your safety. Remember, this information serves as a powerful educational resource but should always be used within the framework of consultation with a healthcare professional.
Why Your Shoulder Deserves Special Attention?

Section 1: Decoding Shoulder Pain: Who is the Main Culprit?
To effectively treat shoulder pain, we must first become familiar with its structure and the reasons problems arise. Understanding these concepts will help you better grasp the logic behind each exercise and follow the treatment plan with greater awareness.
A. Functional Anatomy of the Shoulder for Everyone
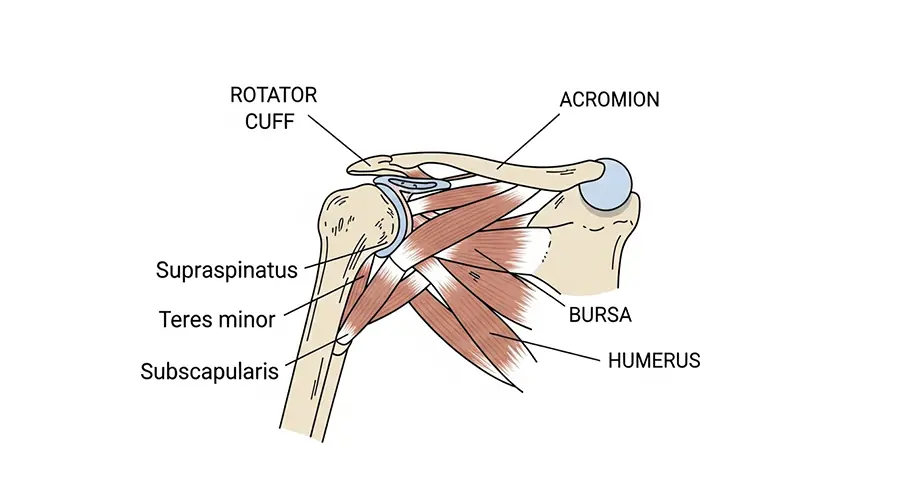
Imagine your shoulder joint is like a ball and socket. The head of the arm bone (humerus) is like a ball that sits in a shallow socket of the shoulder blade (scapula). To keep this mobile joint stable, several key structures work together:
- Rotator Cuff: Think of this structure as a four-member team of small muscles that, like a cuff, embrace the head of the humerus and hold it firmly in the center of the socket. These muscles are responsible for rotating and lifting the arm, as well as providing dynamic stability to the joint.
- Bursa: A small, fluid-filled sac that acts as a cushion between the rotator cuff tendons and the bone above the shoulder (acromion). The bursa’s job is to reduce friction during movement.
- Acromion: This bony projection from the scapula forms the “roof” of the shoulder joint. The space beneath the acromion (the subacromial space) is where the rotator cuff tendons and the bursa pass through.
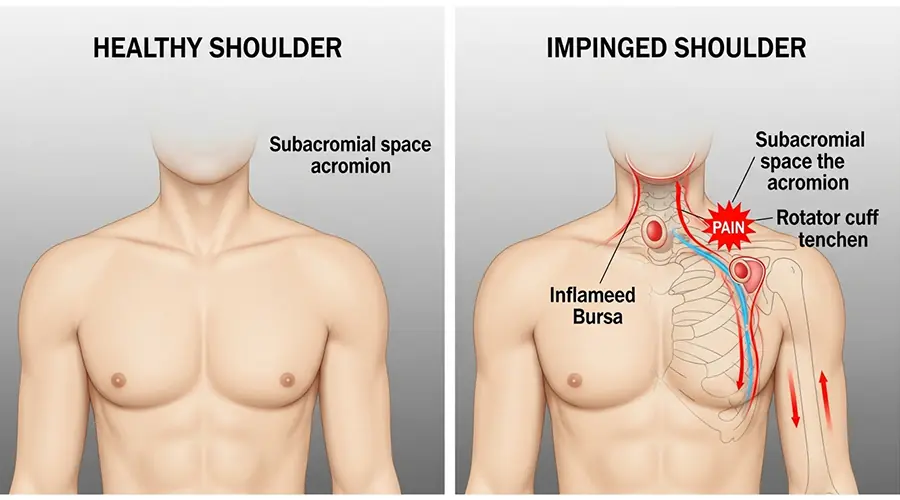
B. Shoulder Impingement Syndrome: The Most Common Cause
Shoulder impingement syndrome, the most common cause of shoulder pain, occurs when the subacromial space narrows, causing “traffic” or “congestion.” In this state, when you raise your arm, the acromion presses on or “pinches” the rotator cuff tendons and the bursa. This repeated pressure leads to inflammation (tendinitis and bursitis) and pain. But what causes this space to narrow? There are two main culprits:
- Poor Posture: This is the most important factor. When you sit in a slouched position for long periods, such as working at a computer, your shoulders round forward. This posture physically reduces the space under the acromion, putting the tendons at risk of compression.
- Muscle Imbalance: Weakness in the rotator cuff muscles and the scapular stabilizing muscles causes the head of the humerus to not sit correctly in the center of the socket. Often, this humeral head moves slightly upward, closer to the roof of the shoulder (acromion), drastically increasing the likelihood of impingement.
This process reveals a clear cause-and-effect chain that is essential to understand for recovery: a daily habit (like sitting at a desk for long hours) leads to a specific posture (rounded shoulders), which results in an anatomical change (narrowing of the subacromial space). This anatomical change causes a pathological injury (compression and inflammation of the tendon), which ultimately leads to a clinical symptom (pain when raising the arm). Therefore, effective treatment must target not only the symptom but this entire chain.
C. A Look at Other Common Causes
Although impingement is the most common cause, shoulder pain can also result from other issues that are often related to or arise from impingement:
- Tendinitis and Bursitis: Inflammation of the tendons or bursa, usually a direct result of chronic impingement.
- Rotator Cuff Tear: These tears can result from an acute injury or the gradual wearing down of the tendon due to long-term impingement.
- Frozen Shoulder: A condition in which the shoulder’s joint capsule becomes thick and stiff, causing severe pain and restricted movement.
- Arthritis: The wear and tear of joint cartilage, which typically occurs at an older age.
D. Warning Signs: When to See a Doctor Immediately
This guide is designed for mechanical and non-acute shoulder pain. If you experience any of the following symptoms, avoid self-treatment and see a doctor or go to an emergency center immediately:
- Severe, sudden pain after an injury or fall.
- Visible deformity in the shoulder joint (suspected dislocation).
- Complete inability to move the arm.
- Sudden, severe weakness in the arm.
- Fever, redness, or significant swelling in the shoulder area (possible signs of infection).
Section 2: The First Step on the Road to Recovery: Smart Self-Assessment and Goal Setting
Before starting any exercise program, it is important to have a better understanding of your problem and a clear treatment strategy. This section helps you observe the effect of your posture on your pain with a simple test and introduces you to the main goals of treatment.
A. The Simple Posture Test
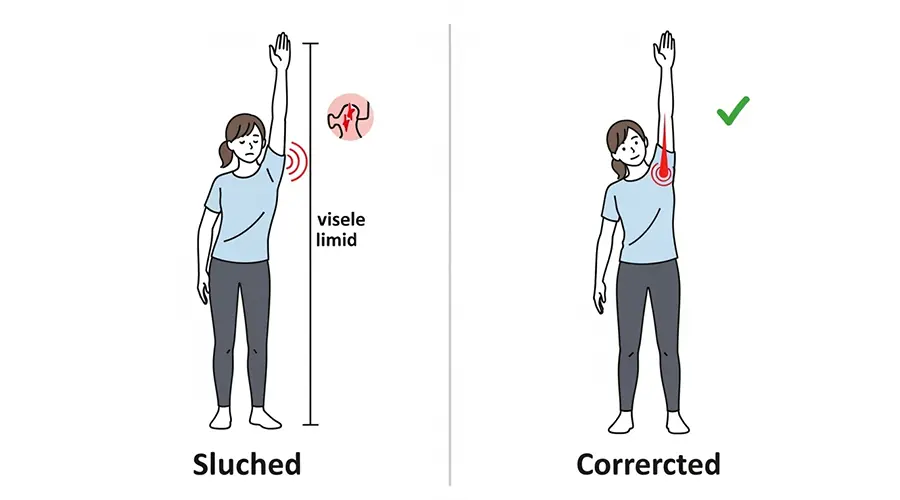
This is a practical test to better understand the connection between your posture and shoulder pain. Perform this test carefully:
- First, stand in your normal, everyday posture. If you usually slouch a bit with your shoulders forward, stay in that position.
- Slowly raise your painful arm out to the side. Note the point where the pain starts or increases, as well as the maximum height you can lift your arm.
- Now, correct your posture. Stand up completely straight, open your chest, and gently pull your shoulder blades back and down (imagine you want to put them in your back pockets).
- While maintaining this correct posture, slowly raise the same arm up again.
You will likely notice that in the correct posture, you can raise your arm higher and feel less pain. This simple and direct experience shows you that correcting your posture is the master key to opening up space in the shoulder joint and reducing impingement.
B. The Three Main Goals of Treatment (The Three-Pillar Framework)
Our rehabilitation program is built on three main pillars. These three principles provide a logical and effective roadmap for treating your shoulder pain. The order of these pillars is not random and reflects a fundamental clinical principle: you must first create a stable foundation and then build strength upon it.
- Pillar One: Scapula Repositioning: The scapula, or shoulder blade, is the foundation for your arm’s movement. If this foundation is in the wrong place (e.g., tilted forward and down), no arm movement can be optimal and pain-free. Therefore, our first step is to activate the muscles that position the scapula in its correct, stable position. This is like fixing a building’s foundation before putting up the walls; a stable scapula provides the correct platform for the rotator cuff to function effectively and safely.
- Pillar Two: Rotator Cuff Strengthening: After we have stabilized the foundation (the scapula), it’s time to strengthen the joint’s fine-tuning muscles, the rotator cuff. These muscles are responsible for keeping the head of the humerus centered in the socket and preventing it from moving too far upward and hitting the acromion.
- Pillar Three: Anterior Muscle Stretching: While strengthening the weak posterior muscles, we must also stretch the tight and shortened muscles at the front of the body (chest and front shoulder muscles). These muscles constantly pull the shoulder forward into the problematic position. Increasing the flexibility of these muscles allows the shoulder to rest more easily in its natural, set-back position.
By focusing on these three goals in a coordinated manner, we not only relieve the pain but also address its primary biomechanical cause.
Section 3: The Comprehensive Physiotherapy Exercise Program (Video-Ready)
This section is the heart of this guide. The exercises are divided into three progressive phases. Follow this comprehensive physiotherapy exercise program with care, focus, and full adherence to the instructions. The golden rule: A little bit of a stretch or muscle fatigue is normal, but sharp or severe pain is absolutely not acceptable. If you experience severe pain, stop the exercise.
A. Phase 1: Release and Mobilization (Weeks 1-2)
Exercise 1: Shoulder Pendulums
Goal: To increase pain-free mobility.
Execution: Lean over and let the affected arm hang down completely relaxed. Using a gentle body swing, move the arm like a pendulum in small circles, and then back and forth. Suggested Reps: 30 to 40 circles in each direction, 2 to 3 times a day. Expert Tip: The motion should come entirely from the swing of your body; do not use your arm muscles to create the movement.
Exercise 2: Doorway Stretch
Goal: To stretch the tight chest and front shoulder muscles.
Execution: Stand in a doorway. Place your hands on the frame at three different heights (low, shoulder-level, high). Keeping your back straight, gently take a step forward until you feel a stretch in your chest. Suggested Reps: Hold each position for 20 to 30 seconds, several times throughout the day. Expert Tip: Keep your back straight and avoid arching it; the stretch should be gentle and controlled.
Exercise 3: Muscle Release with a Ball
Goal: To reduce tightness and trigger point pain.
Execution: Place a tennis ball between your back shoulder or chest and a wall. Gently roll over tender and painful spots, maintaining pressure. Suggested Reps: Hold pressure on each tender spot for 20 to 30 seconds, for 4 to 5 minutes in each area. Expert Tip: Breathe deeply and calmly while applying pressure.
B. Phase 2: Activation and Stabilization (Weeks 2-4)
Exercise 4: Scapular Squeeze
Goal: To activate the rhomboid and mid-trapezius muscles to correct rounded shoulders.
Execution: Stand or sit. Gently squeeze your shoulder blades together (as if you’re trying to hold a pencil between them). Suggested Reps: Repeat 10 to 15 times, holding each squeeze for 5 to 10 seconds. Expert Tip: Do not raise your shoulders toward your ears. The movement should be straight back.
Exercise 5: Prone W & A Exercises
Goal: To strengthen the scapular stabilizers and external rotators against gravity.
Execution: Lie on your stomach and engage your abs. In the A position (arms by your sides) and W position (elbows bent), lift your hands by squeezing your shoulder blades back and down. Suggested Reps: 2 to 3 sets of 10 for each exercise, holding each for 3 to 5 seconds. Expert Tip: Keep your abdominal muscles slightly contracted to prevent your lower back from arching.
Exercise 6: Side-Lying External Rotation
Goal: To effectively isolate and strengthen key external rotator muscles of the rotator cuff.
Execution: Lie on your healthy side. Place a small towel under the elbow of your top arm. Bend the elbow to 90 degrees and, keeping it fixed on the towel, slowly raise the back of your hand toward the ceiling. Suggested Reps: 3 sets of 10 to 12. Start with no weight, then progress to a very light weight. Expert Tip: Keep the towel firmly under your elbow to ensure the movement comes only from shoulder rotation.
C. Phase 3: Strengthening and Control (Weeks 4-8 and Beyond)
Exercise 7: Shoulder Rows with Resistance Band
Goal: To strengthen the scapular stabilizing muscles in a functional movement pattern.
Execution: Anchor a resistance band at waist height. First, squeeze your shoulder blades together, then bend your elbows and pull the band to your chest. Suggested Reps: 3 sets of 15 to 20. Expert Tip: Always initiate the movement by squeezing the shoulder blades, not by pulling with your arms.
Exercise 8: Sword Raises
Goal: For functional, multi-dimensional strengthening of the rotator cuff.
Execution: Anchor the band at a low height. Pull the hand diagonally and smoothly from your hip up and across your body. Simultaneously rotate your wrist so that your thumb points to the ceiling at the end. Suggested Reps: 3 sets of 10 on each side. Expert Tip: The movement should be controlled and smooth, focusing on the gentle rotation of the shoulder.
Exercise 9: Prone T, Y, I Raises
Goal: To strengthen the different fibers of the shoulder-supporting back muscles.
Execution: Lie on your stomach. Initiate the movement by squeezing the shoulder blade. Slowly lift the arm in three separate directions: T (out to the side), Y (diagonally), and I (straight back). Suggested Reps: 2 to 3 sets of 10 for each position. Expert Tip: The main focus should be on squeezing the shoulder blade to start the movement, keeping the neck relaxed.
Section 4: Beyond the Basic Exercises: A Deeper Understanding of the Kinetic Chain
Your shoulder pain is not necessarily a “shoulder problem.” Often, the pain is a cry for help from a joint that is being overstressed due to problems in other areas of the body. Understanding these connections will change your perspective on recovery and help you achieve more sustainable results.
A. The Vital Role of the Thoracic Spine
The thoracic spine (the mid and upper back) plays a crucial role in shoulder health. To be able to fully raise your arm overhead, your thoracic spine must be able to extend. If this area of your back is stiff and “locked” (which is very common in desk workers), the scapula cannot move correctly on the rib cage. As a result, to compensate for this lack of movement, the shoulder joint is forced to overwork in a poor position, which directly leads to impingement. In other words, a stiff back suffocates the shoulder.
Key exercise for thoracic spine mobility:
- Quadruped Thoracic Rotation: Get on all fours. Place one hand behind your head. Slowly bring that elbow down toward your supporting elbow. Then, rotate it up toward the ceiling, following it with your eyes. The rotation should come from your mid-back, not your lower back. Suggested Reps: Perform 2 sets of 10 to 12 on each side.
B. The Concept of the Kinetic Chain
This concept completely changes your understanding of movement. Our bodies do not work in isolation; they are an interconnected chain. In overhead movements like throwing, serving in tennis, or even placing an item on a high shelf, force is generated from the ground up. This force travels from the legs to the hips, then to the core muscles and trunk, and finally through the scapula and shoulder to the arm and hand. This process is like the crack of a whip, where energy is transferred from the handle to the tip.
If any of the links in this chain (e.g., the core or hip muscles) are weak, the chain “breaks.” In this case, the shoulder, which is the last link to transfer force before the arm, is forced to work overtime on its own to generate the lost power. This extra work makes the shoulder prone to injury. Therefore, your shoulder pain may actually be a sign of weak abdominal muscles or insufficient mobility in your hips. This holistic view reminds us that shoulder health depends on the health and coordination of the entire body.
Section 5: The Recovery Roadmap and Common Mistakes
Having a clear plan and being aware of potential pitfalls on the rehabilitation path will dramatically increase your chances of success.
A. Timeline and Progression
- Start: Begin with 5 repetitions for each strengthening exercise and focus all your attention on performing the movement correctly. Quality always trumps quantity.
- Progress: Every day or every other day, add 1 to 2 repetitions to each exercise until you reach the goal of 10 to 15 reps per set.
- Frequency: You can do the Phase 1 exercises (release) several times a day. Perform the Phase 2 and 3 exercises (strengthening) once a day, 5 days a week.
- Expected Recovery Time: Although you may feel better sooner, significant and lasting improvement in strength and function typically requires 6 to 8 weeks of consistent exercise. Some rehab programs may take 3 months or more. Be patient and trust the process.
B. The 5 Deadly Sins of Shoulder Rehab
Strictly avoid these common mistakes that can slow or even reverse your recovery process:
- Pushing Through Pain: This is the biggest mistake. The “no pain, no gain” mantra has no place in rehabilitation. Feeling mild fatigue or a gentle stretch is normal, but sharp, burning, or pain that worsens after exercise is a stop sign. Listen to your body.
- Using Heavy Weights Too Soon: In shoulder rehab, correct form is king. Using a weight that is difficult for you to control will cause you to use other muscles (especially the neck and upper trapezius) to compensate. This reinforces the wrong movement pattern and makes the problem worse.
- Neglecting the Back Muscles: Many people instinctively focus on strengthening the “mirror muscles” (the muscles they see in the mirror, like the chest and front of the shoulder). This exacerbates the muscle imbalance that is the root cause of impingement. The key to shoulder health lies in its back.
- Shoulder Shrugging: When performing exercises, especially arm-raising movements, be careful not to shrug your shoulder up toward your ear. This is a common compensation that indicates the upper trapezius is doing the work instead of the weak rotator cuff. Always keep your shoulders “back and down.”
- Lack of Consistency: Recovery doesn’t happen overnight. Performing exercises irregularly and sporadically will not yield desirable results. Rehabilitation requires daily commitment and consistency over a period of several weeks.
Section 6: Frequently Asked Questions (FAQ)
In this section, we answer some common questions about physiotherapy for shoulder pain.
Can physiotherapy cure shoulder pain?
Yes. For most common causes of shoulder pain, especially impingement syndrome, tendinitis, and non-acute rotator cuff tears, physiotherapy and therapeutic exercise are recognized as the first line of treatment. Strong scientific evidence shows that a proper exercise program can significantly reduce pain, improve function, and in many cases, eliminate the need for more invasive procedures like injections or surgery.
Do all shoulder injuries require surgery?
No. The vast majority of shoulder problems, especially those caused by overuse, poor posture, and degenerative changes, respond well to conservative treatments like physiotherapy. Surgery is usually considered for severe traumatic injuries (like large, full-thickness tendon tears in young, active individuals), recurrent dislocations, or cases where a full course of conservative rehabilitation has failed to produce improvement.
What is the role of Manual Therapy?
Manual therapy includes techniques like joint mobilization and soft tissue release performed by a physiotherapist. Evidence in this area suggests that manual therapy alone may have limited effects. However, when used as part of a comprehensive program along with therapeutic exercise, it can help reduce short-term pain and improve range of motion. This allows the patient to perform the necessary exercises with less pain and better quality. Therefore, manual therapy is a useful adjunctive tool alongside therapeutic exercise, not a substitute for it.
How long will it take to feel improvement?
This depends on the severity of the injury, your adherence to the program, and individual factors. Generally, you might experience some pain reduction and minor improvement in movement in the first 2 to 3 weeks. However, to see significant and lasting improvement in strength and function, you should exercise consistently for at least 6 to 8 weeks. Some rehabilitation protocols may take 12 weeks or more to achieve full results. Patience and consistency are the keys to success.
Conclusion: Take Charge of Your Shoulder Health
The journey to recovery from shoulder pain is a path that requires knowledge, patience, and most importantly, your active participation. This guide has provided you with the necessary tools to begin this journey by presenting a comprehensive framework based on three main pillars – correcting scapular posture, strengthening the rotator cuff, and stretching tight muscles. Remember that consistency and correct execution of movements are far more important than the speed or intensity of the exercises.
This process is an opportunity to invest in your long-term health. By gaining a deeper understanding of how your body works and adopting correct movement habits, you not only treat your current pain but also prevent future problems. You now have the power to take control of your shoulder health.
Final and Very Important Note: This article is a comprehensive and evidence-based educational resource, but it is never a substitute for an individual diagnosis and consultation by a qualified healthcare professional (doctor or physiotherapist). Shoulder pain can have various causes, and an effective treatment plan must be designed based on an accurate diagnosis tailored to your specific condition. Before starting this or any new exercise program, it is strongly recommended that you consult with a professional to ensure your diagnosis is correct and to receive the necessary guidance.
Ready to address the root cause of your shoulder pain?
Our specialized physiotherapy programs in Dubai are tailored to your unique condition.